Ublox Tab
Introduce
This function allows users to configure Ublox module in the same way as Ublox Center software. Just connect the UART1 port (ESPrtk) to the UART-Configure (Ublox module), select the appropriate baudrate and start the configuration.
This function uses the latest Ublox Center API and protocol and supports configuration on all of Ublox’s latest product lines such as F9P-M8P-LEA -NEO.
Hardware connect
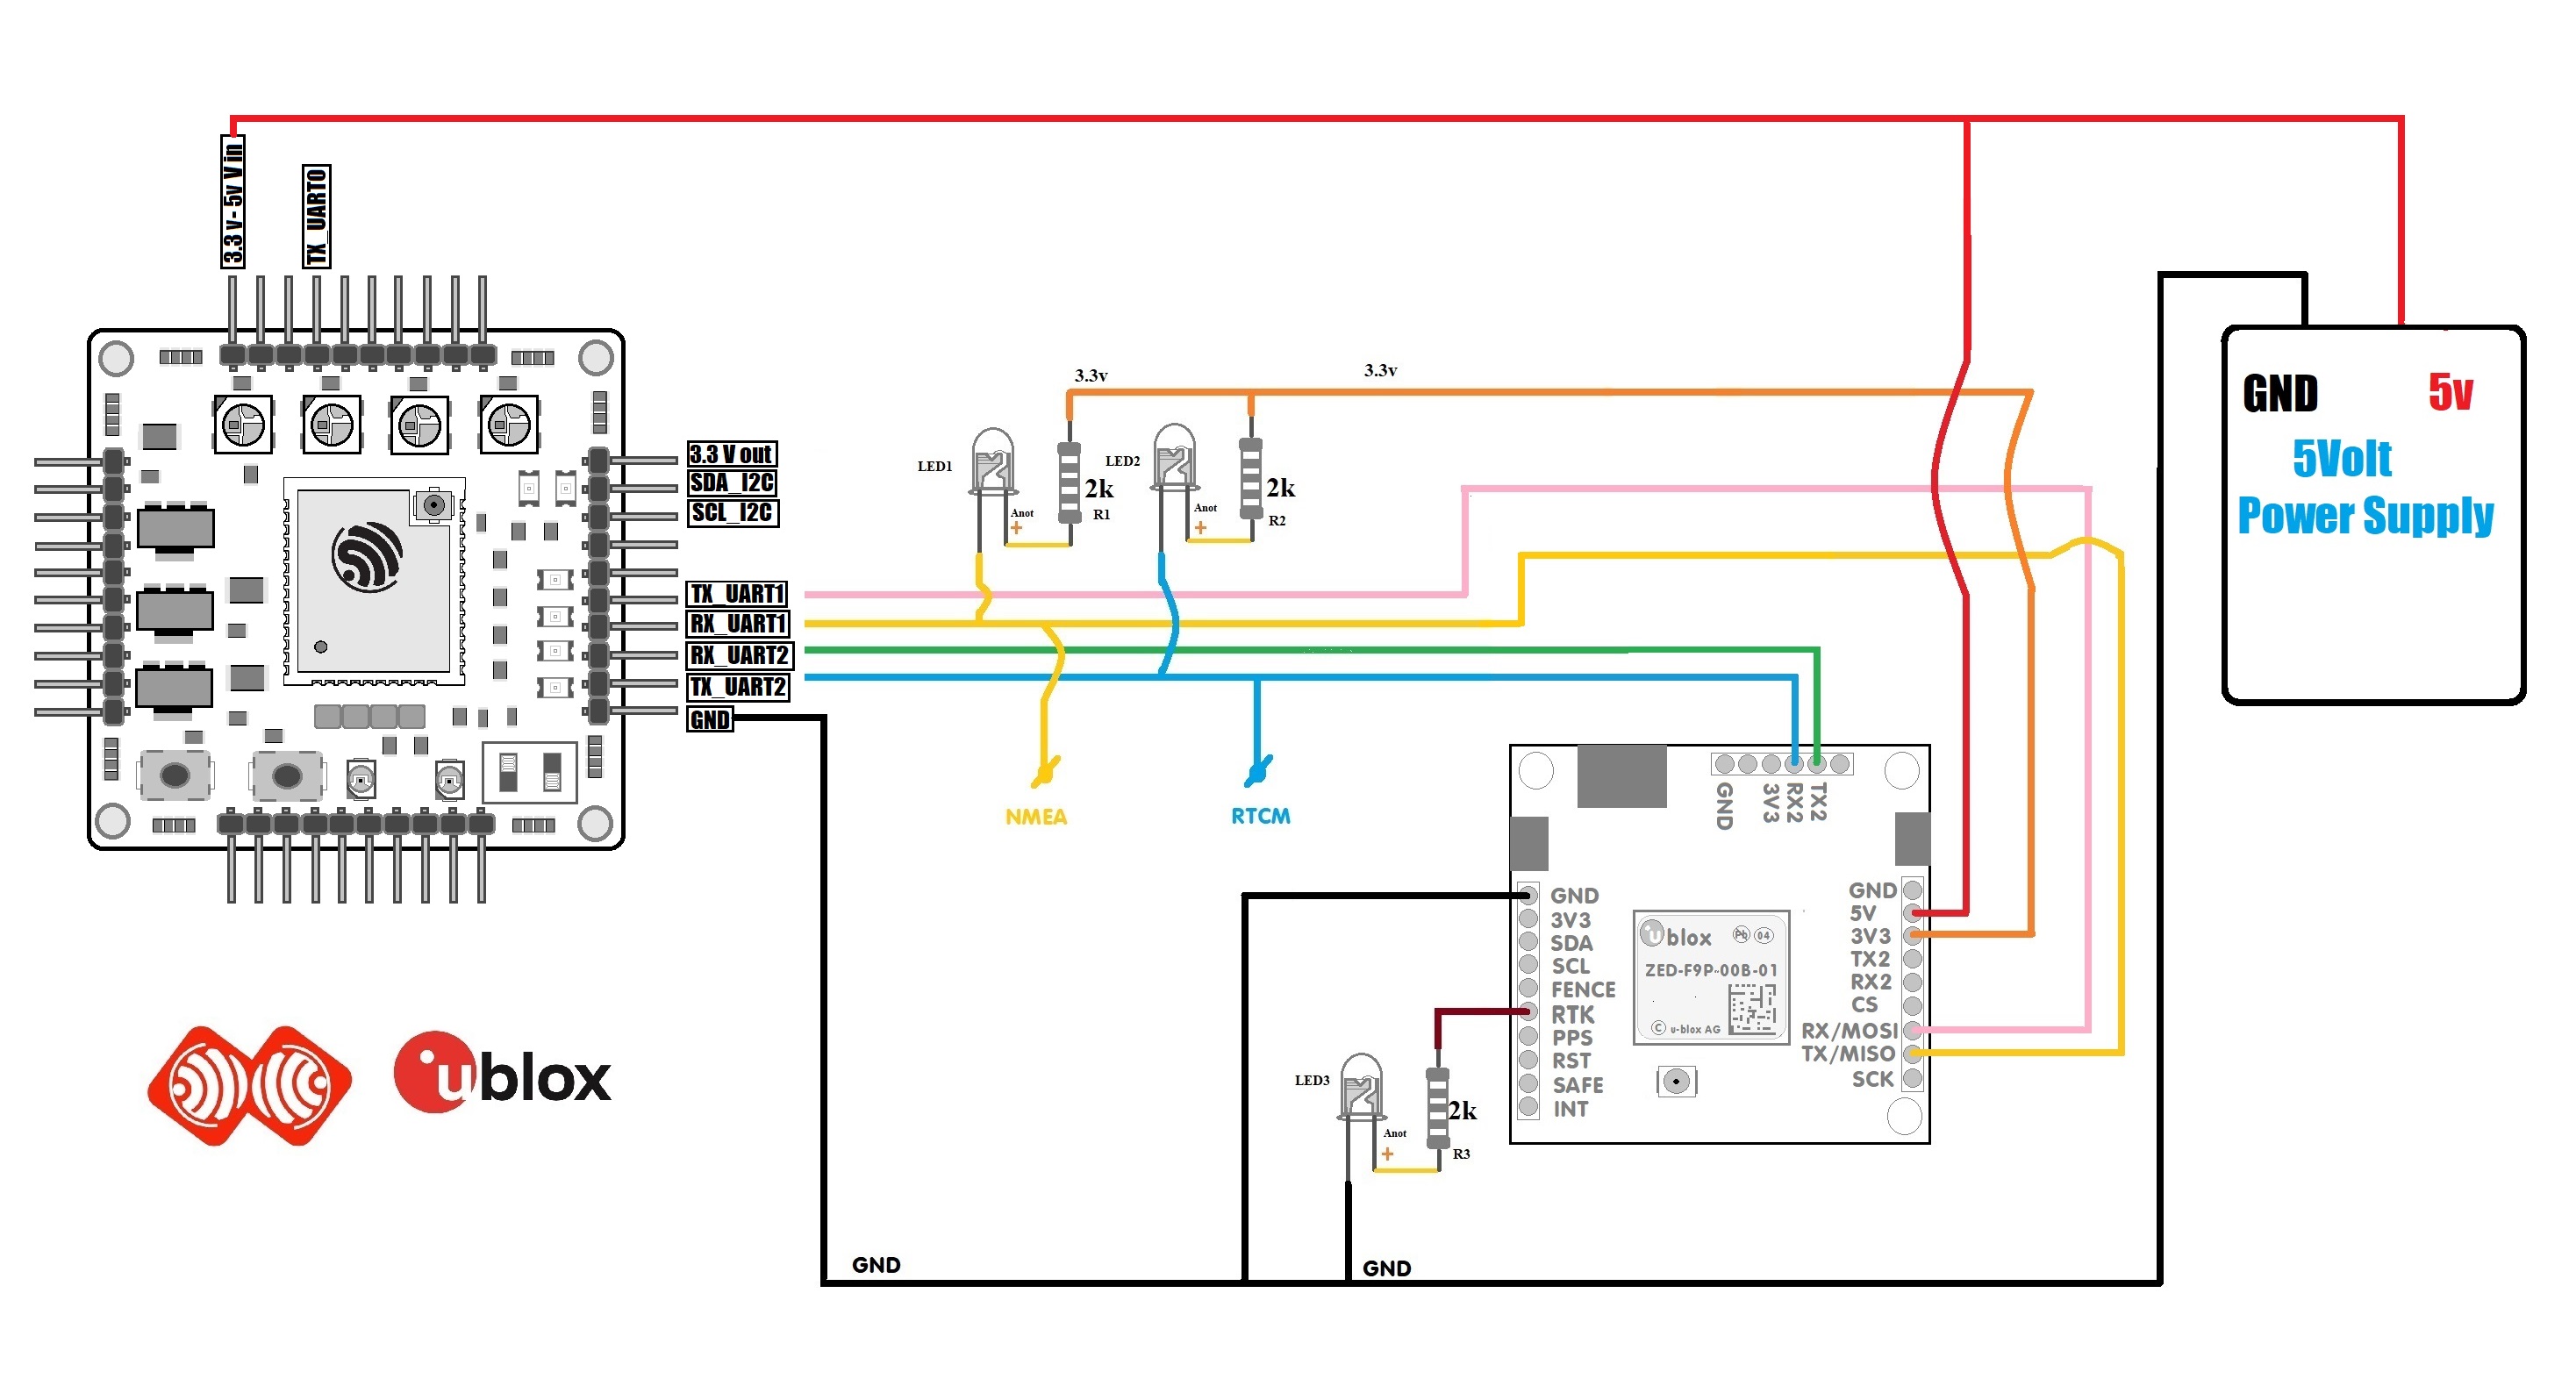
| ESPrtk | ZED-F9P | M8P - LEA -NEO | Other |
|---|---|---|---|
| TX-UART1 | RX1 | RX1 | RX-UART Conigure |
| RX-UART1 | TX1 | TX1 | TX-UART Conigure |
| TX-UART2 | RX2 | RX2 | RX-UART Conigure |
| RX-UART2 | TX2 | TX2 | TX-UART Conigure |

To use
Connect UART port as table above.
-
1- First, start connecting to the module with a baudrate.
-
2-Use "Autoscan Baudrate" to scan if dont know baudrate.
-
3-Select configure function , select yourconfigure item , press SEND configure .
TIP :
-
Wait a moment after changing the baudrate.
-
Do not click too quickly (after configure, you need wait a moment).
-
Items marked with '*' are not supported yet.
-
Scroll the Configure tab to see the full component.
Have some tutorials below how to configure Ublox module:
https://drotek.com/section/dropixpixhawk-integration-2/
https://www.youtube.com/watch?v=n8PUyOtiGKo
Support function
Communicate | Support |
UART1 / UART2 Switch + Multi baudrate + Auto scan baudrate Ublox device | ● |
Automatically detect errors of input data. | ● |
| Ublox Configure function | Support |
0 | ANT (Antenna Settings) | ● |
1 | BATCH (Batch mode output) | ● |
2 | CFG (Configuration) | ● |
3 | DAT (Datum) | ● |
4 | DGNNS (Differential GNSS configure) | ● |
5 | DOSC (Disciplined Oscillator) | ● |
6 | EKF (EKF Settings) | ◌ |
7 | ESFGWT (Gyro + Wheeltick) | ◌ |
8 | ESRC (External Source Config) | ● |
9 | FXN (Fix Now Mode) | ◌ |
10 | GEOFENCE (Geofence Config) | ● |
11 | GNSS (GNSS Config) | ● |
12 | HNR (High Nav Rate) | ● |
13 | INF (Inf Message) | ● |
14 | ITFM (Jamming/Interference Monitor) | ● |
15 | LOGFIL (Log Settings) | ● |
16 | MSG (Messages) | ● |
17 | NAV5 (Navigation 5) | ● |
18 | NAVX5 (Navigation Expert 5) | ● |
19 | NMEA (NMEA Protocol) | ● |
20 | ODO (Odometer/Low-Speed COG filter) | ● |
21 | PM (Power Management) | ◌ |
22 | PM2 (Extended Power Management) | ● |
23 | PMS (Power Management Setup) | ● |
24 | PRT (Ports) | ● |
25 | PWR (Power) | ● |
26 | RATE (Rates) | ● |
27 | RINV (Remote Inventory) | ● |
28 | RST (Reset) | ● |
29 | RXM (Receiver Manager) | ● |
30 | SBAS (SBAS Settings) | ● |
31 | SLAS (SLAS Settings) | ● |
32 | SMGR (Sync Manager Config) | ● |
33 | TMODE (Time Mode) | ◌ |
34 | TMODE2 (Time Mode2) | ● |
35 | TMODE3 (Time Mode 3) | ● |
36 | TP (Timepulse) | ● |
37 | TP5 (Timepulse 5) | ● |
38 | TXSLOT (Tx Time Slots) | ● |
39 | USB (Universal Serial Bus) | ● |
40 | VALDEL (New Configuration) | ◌ |
41 | VALGET (New Configuration) | ◌ |
42 | VALSET (New Configuration) | ◌ |
43 | ESPrtk - Hex configure Ublox tool | ● |
Support configure by List of Hex code.
This function is available on version 2.6.1 (or higher).
This function allows users to configure Ublox modules with Hex code.
(These codes are the PAYLOAD part in the communication frame to configure Ublox’s module, can find the communication frame at the configuration documents).
ESPrtk also supports syntax errors filter , error alerts, data dumps, auto-sending …
The configuration files (.TXT) for F9P /M8P can be found on this page:
https://www.ardusimple.com/question/example-configuration/
https://rtklibexplorer.wordpress.com/2016/02/03/collecting-raw-gps-data-with-rtklib/
https://cerea-forum.de/filebase/index.php
Ublox ZED-F9P configure Hex code file :

The input field has the format:
<Configuration Name> – <Hex code> <Enter)
For example:
CFG-MSG – 06 01 08 00 0A 06 00 00 00 00 00 00
CFG-MSG – 06 01 08 00 0A 07 00 00 00 00 00 00
CFG-MSG – 06 01 08 00 0A 21 00 00 00 00 00 00
Check input:
- Configuration name and Hex code are separated by dashes: ‘-‘.
- Each hex value must be separated by a space.
- The configuration commands must be separated by new lines (enter).
- A Byte Hex must contain at least 1 characters (and no more than 2 characters).
- Irrespective of uppercase and lowercase letters.
For example, all four ways below are valid and have the same output:
- Hex 1 = 01 02 0F 07 00 0D
- Hex 2 = 1 2 F 7 0 D
- Hex 3 = 1 2 f 7 0 d
- Hex 4 = 01 2 f 07 0 d
All of the four Hex codes above have a unique output:
- Hex = 01 02 0F 07 00 0D
See a short video below to use this function :
Save configure every time upload Hex code.
By default, configuration commands are not saved in Flash and they will be lost when the module is reset.
You can add save configuration data to the file every time you upload Hex code.
For example:
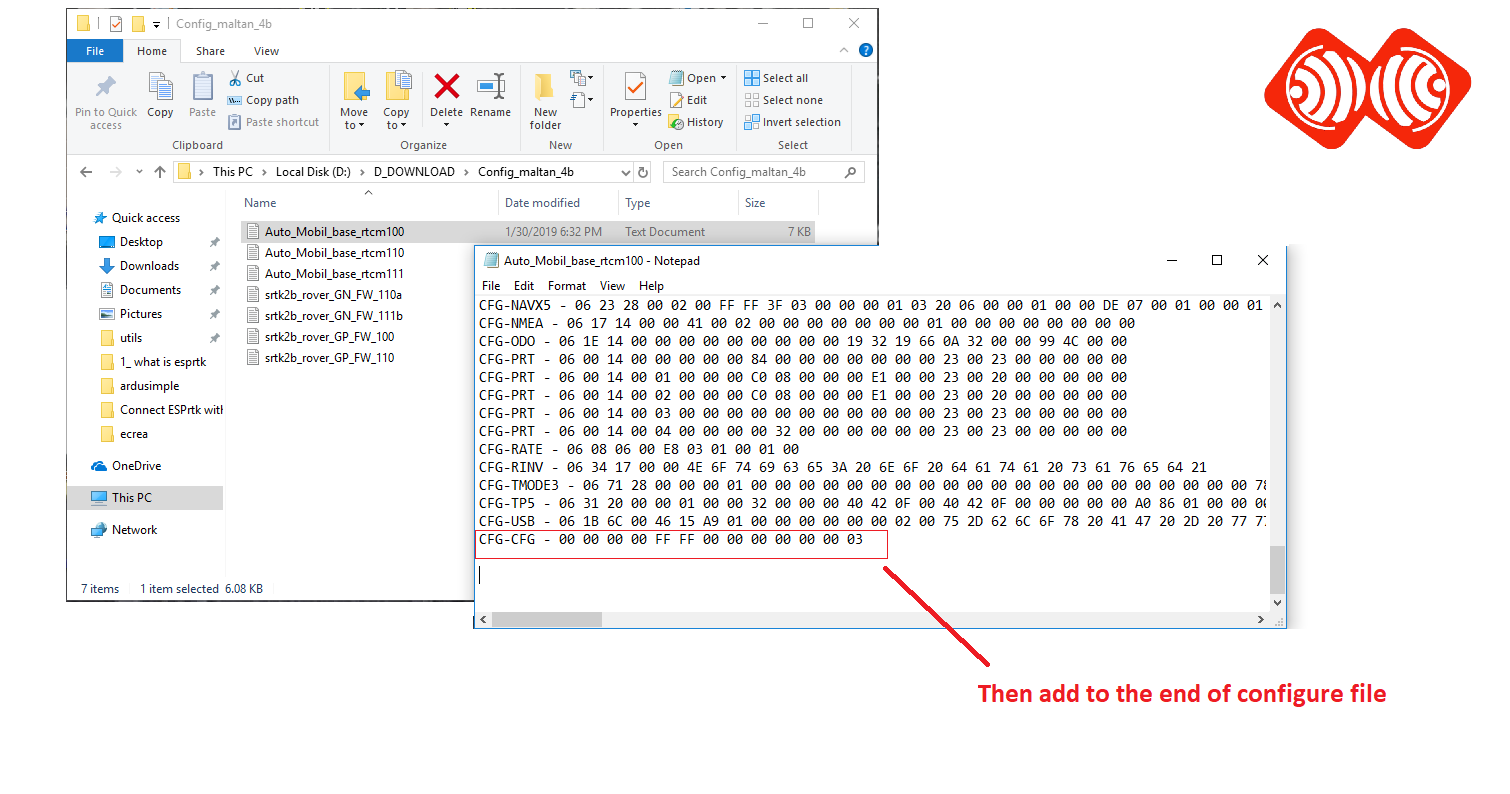
Open U-Center and choose CFG-CFG. Select Show Hex Tonggle and you will see the configuration code.
Its full form is: [ B5 62 06 09 0D 00 00 00 00 00 FF FF 00 00 00 00 00 00 03 1D AB ]
You need to Copy the 13 Payload bytes behind the first 6 bytes (B5 62 06 09 0D 00) .
They are [ 00 00 00 00 FF FF 00 00 00 00 00 00 03 ].
You can then add to your configuration file. Please add to the end of the file.