Display and collect XYZ 3-axis magnetometer data to make calibration magnetometer more simple and professional with wireless connection (WIFI).
All you need to do is rotate and rotate !

Wiring MPU9250 to use with ESPrtk
See the circuit diagram here : IMU-MPU9250 Export IMU data in Real time.

Configuration :
Sample Setting:
Sample rate (Hz): Speed reading magnetometer data from sensor.
Max sample : Set limits for the number of samples collected. (The collection process will automatically stop when enough).
File format export : Format of data file , support ‘.txt’ and ‘.svc’.

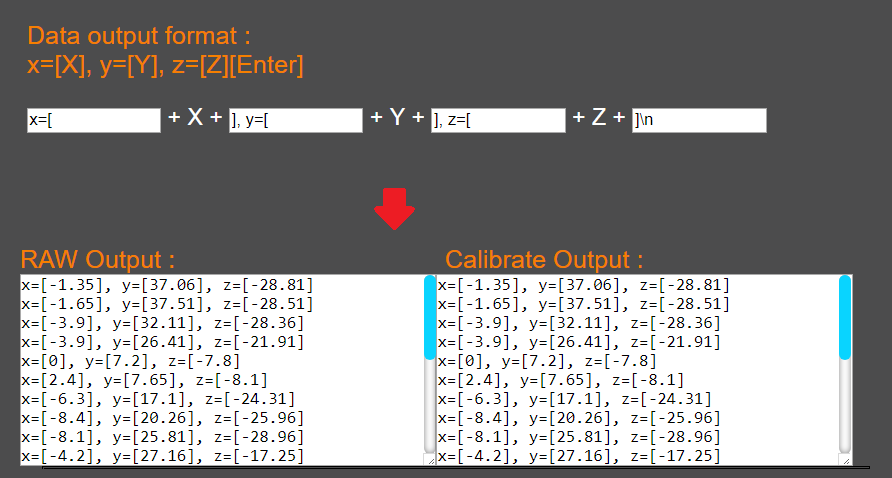
Data output format :
Option to configure the content of the data file by inserting text (Text1-2-3-4) in front – between or after each X Y Z value.
Then output will be :
Output each sample = Text1+X+Text2+Y+Text3+Z+Text4.

Example 1:
- Text1 : ‘x=’
- Text2 : ‘ y=’
- Text3: ‘ z=’
- Text 4: ‘\n’
- Output:
-


Example 2 :
- Text1 : ‘x=[‘
- Text2 : ‘], y=[‘
- Text3: ‘], z=[‘
- Text 4: ‘]\n’
- Output:
-

3D View , control , and download file.

3D View :
Note: 3D points of Raw data and Calibrated data only showing after get more than 200 sample !
- Scroll vertical scale bar to change distance view from Camera
- Left-press the mouse and move to change angle view.
- Raw data show as points with red color.
- Calibrated data show as points with blue color.
- Select or Unselect ‘Raw’ checkbox to Show/Hide Raw points .
- Select or Unselect ‘Cal’ checkbox to Show/Hide Calibrated points .
Control and download :
- Press Start to start or continue get sample data.
- Press Stop to Pause get sample data
- Press Clear to clear all sample in file.
- Press ‘Download Raw’ to download RAW file (non calibrated).
- Press ‘Download Cal’ to download Calibrated file .
Calibrate magnetometer on ESPrtk - Input data from real Sensor.
Setting:
Step 1: Clear screen , press Start button and rotating your sensor to different directions/angles.
You can see the above video !

Step 2: Press Stop button and then press Auto Calibrate button.

Final Step : Checking the result and apply new matrice to IMU MPU9250 configue tab .


Calibrate magnetometer on ESPrtk - Input data from Text string.
Step 0: Setting.

Step 1: Clear screen , type data into the textbox and press Apply as Raw button.

Final Step : Checking the result and apply new matrice to IMU MPU9250 configue tab .


Using transformation matrix on ESPrtk.

ESPrtk's calibration quality is very high.
ESPrtk version 3.9.8 uses artificial intelligence (AI) to solve noise removal and automatically find the calibration matrix very accurately.
It has been tested many times with different data inputs (a lot of noise, missing spherical data) and both solved them perfectly.
The research results can be found here:
Go to this post to learn more : IMU MPU9250 ; Calibrate magnetometer on ESPrtk using AI


Display and collect XYZ 3-axis magnetometer data to make calibration magnetometer more simple and professional with wireless connection (WIFI).
All you need to do is rotate and rotate !

Wiring MPU9250 to use with ESPrtk
See the circuit diagram here : IMU-MPU9250 Export IMU data in Real time.
Configuration :
Sample Setting:
Sample rate (Hz): Speed reading magnetometer data from sensor.
Max sample : Set limits for the number of samples collected. (The collection process will automatically stop when enough).
File format export : Format of data file , support ‘.txt’ and ‘.svc’.
Data output format :
Option to configure the content of the data file by inserting text (Text1-2-3-4) in front – between or after each X Y Z value.
Then output will be :
Output each sample = Text1+X+Text2+Y+Text3+Z+Text4.
Example 1:
- Text1 : ‘x=’
- Text2 : ‘ y=’
- Text3: ‘ z=’
- Text 4: ‘\n’
- Output:
-
Example 2 :
- Text1 : ‘x=[‘
- Text2 : ‘], y=[‘
- Text3: ‘], z=[‘
- Text 4: ‘]\n’
- Output:
-
3D View , control , and download file.
3D View :
Note: 3D points of Raw data and Calibrated data only showing after get more than 200 sample !
- Scroll vertical scale bar to change distance view from Camera
- Left-press the mouse and move to change angle view.
- Raw data show as points with red color.
- Calibrated data show as points with blue color.
- Select or Unselect ‘Raw’ checkbox to Show/Hide Raw points .
- Select or Unselect ‘Cal’ checkbox to Show/Hide Calibrated points .
Control and download :
- Press Start to start or continue get sample data.
- Press Stop to Pause get sample data
- Press Clear to clear all sample in file.
- Press ‘Download Raw’ to download RAW file (non calibrated).
- Press ‘Download Cal’ to download Calibrated file .
Calibrate magnetometer on ESPrtk.
Compensating hard-iron-and-soft-iron-effects on compass sensor using trasnsformation matrix.
Go to this post to learn more : IMU MPU9250 ; Calibrate magnetometer on ESPrtk using Magneto1.2.
